Thursday, June 23, 2011

Art Quilt


 I have always been fascinated by trees.  Since I was a small child I loved to draw trees, not that I'm very good at it, just that it is so amazing how the branches grow and head off in all different directions.

Maybe it's because I am ALWAYS in SO MANY DIFFERENT DIRECTIONS AT ONCE!!


I wanted to play with the yarn in this picture and it just looked like a great 'bark' color so I decided that it would make a good 3-D tree feature.

I cut out a background piece for the tree top and two landscape pieces for the bottom and placed them on the blue fabric I wanted for the sky.  Using detailed embroidery stitches I outlined and attached the tree top to the background.  I then sewed the yarn into place to form the tree.


Once the tree was formed I used detail embroidery stitches and free-motion quilting to add dimension to the landscape pieces at the base. 
Stars sparkling in the night.
I continued free-motion stitching the sky then add small Swarovski Crystals for create tiny far away stars and larger shell buttons for closer stars.
And here is the completed Quilt
It's to be one in a series...
I better get creating!!!

MJ Art Quilt Tree Series 1 Fall Tree Night OOAK Wall Hanging

  This Art Quilt Mini measures 11" x 11 3/4"

To View in my Etsy Store

Log Cabin Pillows with Theme Fabrics!

As a follow up to my last post, I wanted to share some additional 
Log Cabin 
pieces.  

While log cabin is my favorite Quilt Square, working with Theme Fabric is one of my favorite design features.
 
This is a 15" pillow.  It was made using 4 log cabin squares plus the border.  
It has an envelope back that you slide the pillow into.
I used a theme fabric for the outside of the squares in this pillow for the  
Musician in your life!!

16" square over a 14" pillow form.

My second themed pillow is to celebrate 
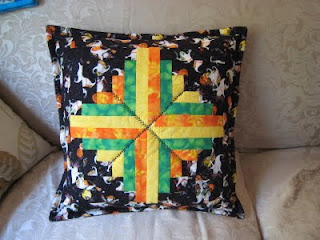
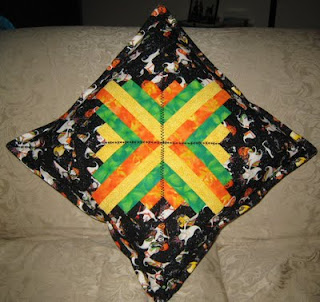
Halloween!
Who can resist these Pirate Ghosts!
17"-18" square over a 16" pillow form.


By pulling out 3 of the main colors in the theme fabric you can nicely design a log cabin block that flows.  Making two different blocks, yellow-green-orange & orange-green-yellow 
gives the design a very eye catching feature.

Both of these items are available in my Etsy Shop: www.etsy.com/shop/MJJoerger

Friday, June 10, 2011

Log Cabin 'Barn Raising'

My absolute favorite traditional quilt block is the Log Cabin.


My favorite way of putting together log cabin blocks is to make the center the same on all the blocks then use 3 lights and 3 darks.  
I number the lights and darks 123 then on one block I use the fabrics in a 123 order and the other a 321 order.  

Make sense?  Probably not.

Above is the 123 order and below the 321 order.  Notice that the inside purple above became the outside purple below.  Doesn't look like much yet.


Next is a picture when you put 2 of each of these blocks together.


 And when you add another row all the way around?

This pattern layout of the log cabin is known as 'Barn Raising.'

I have a finished quilt! Actually there is also binding added that matches the center color and brings the whole project together. The quilt seems a bit rounded in it's lines, that is because I made the light strips a 1/4" thinner than the dark and that creates the 'flow'.
This quilt measures only 13 1/2" square.  Looks a lot bigger doesn't it?  This quilt was a birthday gift I made for my wonderful friend Anita who loves purple and green and flowers!  I made her a tote bag to match...  But that's another day!

When I googled 'Log Cabin Quilt Pattern Tutorial' I got almost 500,000 hits.  Below are a couple of links I thought did a great job of explained 'how to'.  
Enjoy! 


Tuesday, June 7, 2011

Saying Thank You..

So often in life we get so busy in our day to day routines that we neglect to follow through on things we mean to do.  Can't just be me?! Can it?  Today I find myself with regret for not following through on something I have been meaning to do....

I went to college as an  adult.  I'd say young adult now as I was 27 at the time, but a full blown married adult is what I felt I was.  It took me nine years of night school during which I worked full time, I gave birth to two beautiful boys, divorced, lived on my own for the first time (not counting the two baby boys!), bought my first condo by myself, and in the last year of school met the man of my dreams and his two young daughters who would become my family.

So much change in nine years.  There was one constant through it all for me and that was a very special man who was my college professor and my amazing mentor.  Benjamin. G. Gardiner.


He was Ben to his students. My first class with Ben was Accounting 101.  I waddled into his class five months pregnant  to find this mid-aged** man dressed with an odd hat standing in front of what appeared to be a grade-school child's lemon-aid stand.  I remembered looking back at the door to check the room number to see if I was in the right class.  I was. I'm not sure which one of us looked funnier as I remember that day.  

What I didn't know that day was just how much I would grow over the next nine years both as a person and a student and how much Ben and his quite sense of humor would influence me.


Ben went on that day to walk us through basic accounting using the monetary platform of the lemon-aid stand.  It stuck and I fell in love with accounting.  Ben would go on to teach a dozen or so of my classes over the next nine years.


My most memorable moment in class was when Ben was handing back the mid-term project of my first computer accounting software class.  The project was to account start-to-finish for one year of a tee-shirt company I believe.  He pulled me aside and said I did a wonderful job on my mid-term.  He went on to say that given the professional hard report cover and the labeled sections, along with the table of contents he was sure that I could charge any client an extra $50 for this, HOWEVER, if I ever handed him in another project like this he would flunk me!  He said he now knew how good I was at putting together this type of project and I was now to find BETTER THINGS TO DO WITH MY TIME!  I laugh as I look back because this was about half way through my course of studies and by this time I had Ben for an instructor for four or five courses and he knew me and my newly divorced situation well enough to know where I was 'hiding' from my real life and this was his way of telling to me get back into living my life. 

Ben taught me many things but mostly he taught me to believe in myself.  As we would prepare for a test he would always tell us 'you have studied hard', 'you are ready for this test', and most of all 'remember - it's all in there!'  Now we just needed to take a deep breath and remember 'it's all in there'.  Just quite everything else down, concentrate , and the material will get to the top of the pile.  And he was right, it always did.

I graduated in 1997 with my BS in Accounting. Ben was at my graduation as were many of my other instructors but it felt every bit like Ben was there just for me. 

Sadly Ben passed away last month.  I always meant to sit down and write him a letter thanking him for the confidence his belief in me gave to me.  Ben was a wonderful man and everyone who's life he touched was better for having known him.  I mourn my teacher, my mentor, and my friend.  But I know Ben, he would be telling me I am once again wasting my time that could be better spent.


You are the best Ben and I will carry you and the wisdom and confidence you gave to me, with me, for all of my days.


**I say mid-aged man with a bit of a chuckle for as I read Ben's obituary I realized that he was on that first day of class the exact age that I am today!  Funny, he always seemed like such a grown up, so sure of himself.  Wonder when I am going to feel that way? 

Is there someone in your life that you've been meaning to call or write a note, 
maybe someone you want to say 'thank you' to?  
Make today that day!

Wednesday, June 1, 2011

Something New!

I fell in love with a game table years ago at Jordan's Furniture.  When my husband and I closed on our lake house last fall we went back to Jordan's looking for the table which would be perfect for our new place.  

Unfortunately the table was no longer available.  Bummer...  

Several weeks later, my husband, the ultimate shopper in our family, phoned me saying "I found your table at a local consignment shop! It's not exactly the same but come and see."  So off to the consignment shop I went!  The table was just what I wanted and had 4 chairs!  Yeahhh!!! This table boast four game boards: Backgammon, Checkers/Chess, Scrabble, & Monopoly, Plus a plain wood piece which makes it just another beautiful piece of furniture.  The set even had all the game pieces intact!  This was quite a find and is even better than the original one I fell in love with....   

Way to go Eric!!

We took the set up to the camp and I gave the wood a thorough cleaning with Murphy's Oil Soap.  Amazingly it looked almost like new with just a few marks for character.  

Only one problem - the chair pads were stained. 
and this was the nicest one!!


This brings me to my 'Something New!' 

I learned how to upholster this weekend  :)  I searched for a striped fabric with bright stripes to go with the theme we are decorating the camp with.  I found just the right fabric at Joann Fabrics.  
 
The chair on the right is the BEFORE and 
the chair on the left... the AFTER!!


The first chair took an hour or so but the other three went much faster.  The hardest part of the process??  Taking out the old staples!  They were a bear to grab hold of but luckily my hubby jumped in to help :)


Don't you just want to sit down and play???